We will try to install WordPress CMS on Debian 11 VPS, we will install and configure Nginx as a reverse proxy, Apache as a web server, PHP Packages, and MariaDB database server.
Web Technology To Use
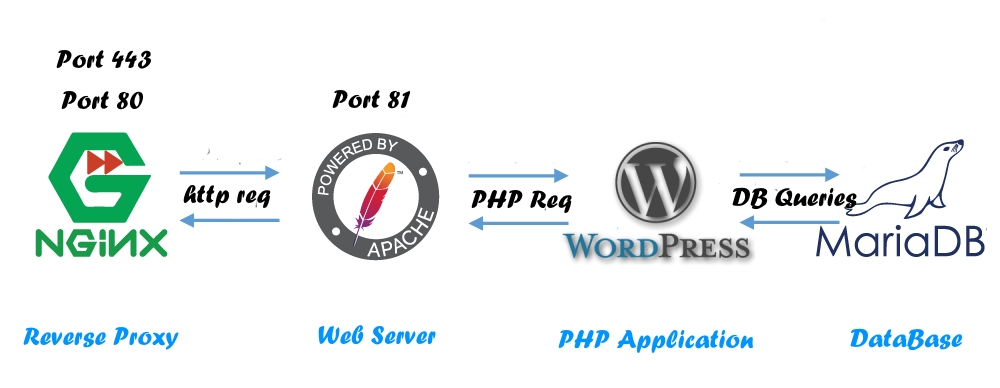
As described in the next figure, we will use:

- Nginx as a reverse proxy (listen Ports 443, 80)
- Apache as a web-server (listen Port 81)
- WordPress CMS Our PHP Web Application
- MariaDB Database Server
We will consider an example domain name: wordpress-lab.com, with server IP-Address: 212.71.255.25
But while you apply this tutorial for your project, do not forget to replace your domain name and IP-Address with yours.
Configure The Debian 11 VPS/Server
We will:
- Update our server.
- Install required packages ( i.e. MariaDB, Nginx, Apache, and PHP ).
- Add The Domain User To The System.
- Install WP-CLI
- Install WordPress
- Set WordPress Files Permission
- Firewalls for all ports except HTTP(S) and SSH.
- Install fail2ban to harden SSH access.
Step1: Update Our Debian 11 VPS/Server
# apt update
# apt upgrade
Step2: Installing And Configure Nginx As A Reverse Proxy
Installing Nginx
# apt install nginx
# systemctl enable nginx
# systemctl start nginx
Configure Nginx As A Reverse Proxy
Create the domain config file wordpress_lab.com.conf in the path: /etc/nginx/sites-available/wordpress_lab.com.conf
# Define Your Server To Listen To Your Plubic IP ADDRESS && HTTP Port 80
# Do not forget to replace Server Public IP-Address and domain name with yours.
# If you want to redirect www to non-www domain, uncomment the next server block.
#server {
#  listen      212.71.255.25:80;
#  server_name www.wordpress-lab.com;
#  access_log off;
#  return 301 http://wordpress-lab.com$request_uri;
#}
server {
  listen      212.71.255.25:80 default;
  server_name wordpress-lab.com;

  # capture the logs
  access_log /var/log/nginx/wordpress-lab.com.log;

  # Adjustment Headers
  add_header X-Frame-Options SAMEORIGIN;
  add_header X-Content-Type-Options nosniff;
  add_header Access-Control-Allow-Origin *;
  add_header Access-Control-Allow-Credentials true;


  #Enable and configure GZIP
  gzip on;
  gzip_static on;
  gzip_comp_level    9;
  gzip_min_length    256;
  gzip_proxied       any;
  gzip_vary          on;
  gzip_buffers           16 8k;
  gzip_http_version  1.1;
  proxy_http_version 1.1;
  gzip_types
    application/atom+xml
    application/javascript
    application/x-javascript
    application/json
    application/ld+json
    application/manifest+json
    application/rss+xml
    application/vnd.geo+json
    application/vnd.ms-fontobject
    application/x-font-ttf
    application/ttf
    application/x-ttf
    application/font-woff
    application/x-font-opentype
    application/x-web-app-manifest+json
    application/xhtml+xml
    application/xml
    font/opentype
    font/ttf
    font/x-woff
    image/bmp
    image/svg+xml
    image/x-icon
    text/cache-manifest
    text/css
    text/javascript
    text/plain
    text/vcard
    text/vnd.rim.location.xloc
    text/vtt
    text/x-component
    text/x-cross-domain-policy;
    # text/html is always compressed by gzip module

  # To allow POST on static pages
  error_page 405 =200 $uri$is_args$args;
  location / {
    # Pass Every request to Apache at the Port 81
    proxy_pass                         http://127.0.0.1:81;
    # Adjustement reverse proxy headers.
    proxy_read_timeout                 640;
    proxy_connect_timeout              640;
    proxy_redirect                     off;
    proxy_set_header Host              $host;
    proxy_set_header X-Real-IP         $remote_addr;
    proxy_set_header X-Forwarded-For   $proxy_add_x_forwarded_for;
    proxy_set_header X-Forwarded-Proto http;
    proxy_set_header X-Forwarded-Port  80;
    proxy_buffers                      16 32k;
    proxy_buffer_size                  64k;
    proxy_request_buffering off;
    proxy_buffering off;
  }
# Enable Caching Static files...
  location ~*  \.(jpg|jpeg|png|gif|ico|css|js|pdf|ttf|woff|eot|bz2|gz|woff2|svg|bmp)$ {

                proxy_pass                         http://127.0.0.1:81;
                proxy_read_timeout                 640;
                proxy_connect_timeout              640;
                proxy_redirect                     off;

                proxy_set_header Host              $host;
                proxy_set_header X-Real-IP         $remote_addr;
                proxy_set_header X-Forwarded-For   $proxy_add_x_forwarded_for;
                proxy_set_header X-Forwarded-Proto http;
                proxy_set_header X-Forwarded-Port  80;
                proxy_buffers                      32 64k;
                proxy_buffer_size                  128k;
                proxy_request_buffering off;
                proxy_buffering off;
                access_log off;
                log_not_found on;
                # Extend Browsers Caching Time for static file
                expires 60d;
    }


}
Go to the directory /etc/nginx/sites-enabled/, then create a symbolic link for our domain config file as the following, and restart the Nginx Daemon.
# cd /etc/nginx/sites-enabled/
# ln -s /etc/nginx/sites-available/wordpress_lab.com.conf ./
# systemctl restart nginx
# systemctl status nginx
Step3: Install And Configure Apache Web Server
Install Apache Web Server
# apt install apache2
Configure Apache
Configure The Apache to listen to port 81 at the localhost, Edit the file /etc/apache2/ports.conf, and set host and port to Listen 127.0.0.1:81 as the following
# vim /etc/apache2/ports.conf
~~~~
# If you just change the port or add more ports here, you will likely also
# have to change the VirtualHost statement in
# /etc/apache2/sites-enabled/000-default.conf

Listen 127.0.0.1:81

#
# Listen 443
#
#
#
# Listen 443
#

# vim: syntax=apache ts=4 sw=4 sts=4 sr noet
~~~~
Configure Our Domain Virtual Host
Go to the directory /etc/apache2/conf-available, and Create our domain virtual host file wordpress_lab.com.conf with the following configs
# cd /etc/apache2/sites-available/
# vim wordpress_lab.com.conf
~~~
<VirtualHost *:81>
      DocumentRoot /home/wordpresslab/public_html
      ServerAdmin info@wordpress-lab.com
      ServerName  wordpress-lab.com
      ServerAlias *.wordpress-lab.com
      ErrorLog ${APACHE_LOG_DIR}/wordpress-lab.error.log
      CustomLog ${APACHE_LOG_DIR}/wordpress-lab.access.log combined
<Directory "/home/wordpresslab/public_html">
    Options Indexes FollowSymLinks MultiViews
    AllowOverride All
    Require all granted
</Directory>
</VirtualHost>
~~~
Go to the directory /etc/apache2/conf-enabled/, and create a symbolic link to our domain virtual host file, as the following
# cd /etc/apache2/conf-enabled/
# ln -s /etc/apache2/conf-available/wordpress_lab.com.conf ./
Now we can create our domain user, and make the public web directory public_html same as the DocumentRoot Value, then we can start the Apache webserver
Step4: Add The Domain New User To The System
We need to add a new user to the system, which will present our domain.
# adduser wordpresslab
Create the public web directory, public_html into the new user home directory /home/wordpresslab/
# mkdir -p /home/wordpresslab/public_html
Start, and check the status of the Apache Webserver
# systemctl start apache2
# systemctl status apache2
Step5: Install and Configure MariaDB The Database Server
Install MariaDB Server And Client
# apt install mariadb-server mariadb-client
# systemctl enable mariadb
Apply Database Basic Security
After installing the Database Server, we need to apply the basic security configuration step.
We need to run the command mysql_secure_installation and Interact with outputs as the following:
- Enter current password for root (enter for none): [Press Enter With Empty Value]
- Switch to unix_socket authentication [Y/n] [Answer n]
- Change the root password? [Y/n] [Answer Y & Enter your database root password]
- Remove anonymous users? [Y/n] [Answer Y]
- Disallow root login remotely? [Y/n] [Answer Y]
- Remove test database and access to it? [Y/n] [Answer Y]
- Reload privilege tables now? [Y/n] [Answer Y]
# mysql_secure_installation

NOTE: RUNNING ALL PARTS OF THIS SCRIPT IS RECOMMENDED FOR ALL MariaDB
SERVERS IN PRODUCTION USE! PLEASE READ EACH STEP CAREFULLY!

In order to log into MariaDB to secure it, we'll need the current
password for the root user. If you've just installed MariaDB, and
haven't set the root password yet, you should just press enter here.

Enter current password for root (enter for none):
OK, successfully used password, moving on...

Setting the root password or using the unix_socket ensures that nobody
can log into the MariaDB root user without the proper authorisation.

You already have your root account protected, so you can safely answer 'n'.

Switch to unix_socket authentication [Y/n] n
... skipping.

You already have your root account protected, so you can safely answer 'n'.

Change the root password? [Y/n] y
New password:
Re-enter new password:
Password updated successfully!
Reloading privilege tables..
... Success!

By default, a MariaDB installation has an anonymous user, allowing anyone
to log into MariaDB without having to have a user account created for
them. This is intended only for testing, and to make the installation
go a bit smoother. You should remove them before moving into a
production environment.

Remove anonymous users? [Y/n] y
... Success!

Normally, root should only be allowed to connect from 'localhost'. This
ensures that someone cannot guess at the root password from the network.

Disallow root login remotely? [Y/n] y
... Success!

By default, MariaDB comes with a database named 'test' that anyone can
access. This is also intended only for testing, and should be removed
before moving into a production environment.

Remove test database and access to it? [Y/n] y
- Dropping test database...
... Success!
- Removing privileges on test database...
... Success!

Reloading the privilege tables will ensure that all changes made so far
will take effect immediately.

Reload privilege tables now? [Y/n] y
... Success!

Cleaning up...

All done! If you've completed all of the above steps, your MariaDB
installation should now be secure.

Thanks for using MariaDB!
Create Database And User
Log in to the database server as database root (we set a database root password in the previous step), as below, and replace PassWord with yours.
We will create a new database named wordpress_db, and a new database user named wordpress_db_user with wordpress_db_password.
You can replace the values with yours, and then flush MariaDB privileges as the following.
# mysql -uroot -pPassWord
Welcome to the MariaDB monitor.  Commands end with ; or \g.
Your MariaDB connection id is 52
Server version: 10.5.12-MariaDB-0+deb11u1 Debian 11

Copyright (c) 2000, 2018, Oracle, MariaDB Corporation Ab and others.

Type 'help;' or '\h' for help. Type '\c' to clear the current input statement.

MariaDB [(none)]> create database wordpress_db;
Query OK, 1 row affected (0.000 sec)

MariaDB [(none)]> GRANT ALL PRIVILEGES ON wordpress_db.* TO 'wordpress_db_user'@'localhost' IDENTIFIED BY 'wordpress_db_password';
Query OK, 0 rows affected (0.001 sec)

MariaDB [(none)]> FLUSH PRIVILEGES;
Query OK, 0 rows affected (0.001 sec)

MariaDB [(none)]>
Step6: Install PHP
# apt install php libapache2-mod-php php-cgi php-common php-mbstring php-zip php-net-socket php-gd php-mysql php-bcmath php-json php-curl php-intl php-soap php-xml php-xmlrpc unzip wget git
Step7: Install WP-CLI
We will install WordPress using WP-CLI the command-line interface for WordPress, we can install WP-CLI as the following
# curl -O https://raw.githubusercontent.com/wp-cli/builds/gh-pages/phar/wp-cli.phar
# chmod +x wp-cli.phar
# mv wp-cli.phar /usr/local/bin/wp
Step8: Install WordPress CMS
Go to our web public directory /home/wordpresslab/public_html, and start the WordPress installation process as the following:
PS: as we are in the root terminal, we will append the suffex “–allow-root” flag at the end of each WP-CLI command.
We will:
- Download The latest WordPress core release.
- Adjustment The WordPress Config File w-config.php, With Database and WebSite Information
- Install The WordPress
As the following:
# wp core download --allow-root
Downloading WordPress 5.9.2 (en_US)...
md5 hash verified: b5e9c3b8dfd767d55c3797c2eae0f57d
Success: WordPress downloaded.

# wp core config --dbname=wordpress_db --dbuser=wordpress_db_user --dbpass=wordpress_db_password --dbhost=localhost --dbprefix=wp_ --allow-root
Success: Generated 'wp-config.php' file.

# wp core install --url="http://wordpress-lab.com" --title="WordPress Lab" --admin_user="Admin" --admin_password="AdminPassWord" --admin_email="info@wordpress-lab.com" --allow-root
Success: WordPress installed successfully.
Step9: Set The WordPress File Permissions
We will do the following:
Append our domain user wordpresslab to the Apache Group www-data
# usermod -a -G www-data wordpresslab
Change the public_heml directory and contents owner and permissions
Go to the domain user home directory /home/wordpresslab and run the following commands
# cd /home/wordpresslab
# chown -R wordpresslab.www-data public_html
# chmod -R 2750 public_html
# chmod -R 2640 public_html/wp-config.php
# chmod -R 2770 public_html/wp-content/
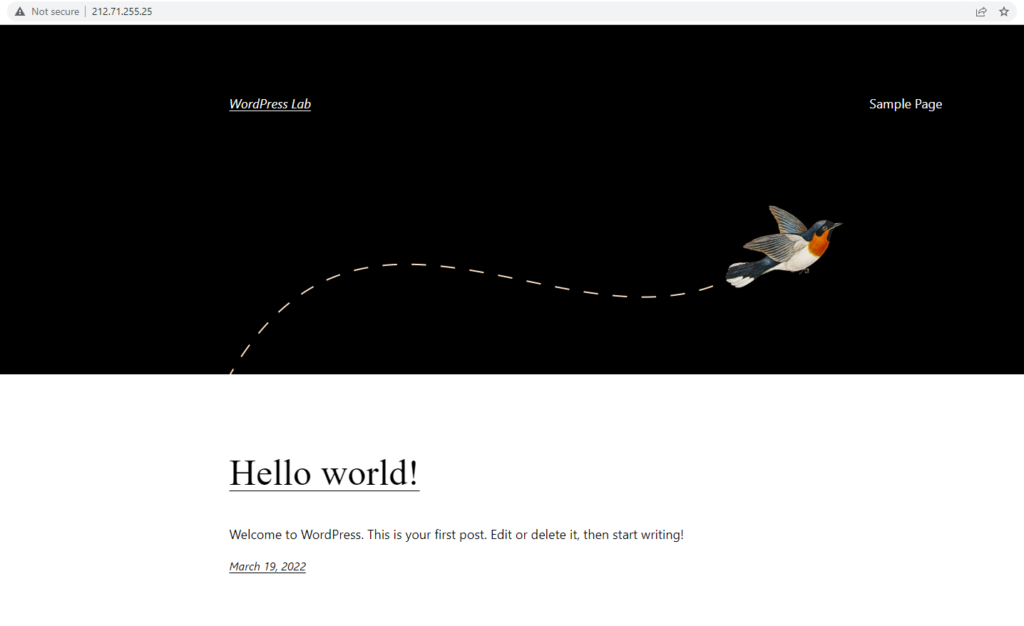
We Can Access our WordPress website using IP-Address or our domain name from the web browser

Step10: Allow Bypass FTP For WordPress Config
Allow install and download files directly without using FTP, we can do it by adding define(‘FS_METHOD’, ‘direct’); line to the wp-config.php file.
# vim /home/wordpresslab/public_html/wp-config.php
~~~
define( 'WP_DEBUG', false );

/* Add any custom values between this line and the "stop editing" line. */
define('FS_METHOD', 'direct');


/* That's all, stop editing! Happy publishing. */
~~~
Step11: Install Fail2ban, Allow & Configure Firewall
Install And Configure UFW
We will Install UFW – Uncomplicated Firewall and configure it to bypass HTTP(s) and SSH Ports.
# apt install ufw

# ufw allow ssh

# ufw allow http

# ufw allow https

# ufw enable
Command may disrupt existing ssh connections. Proceed with operation (y|n)? y
Firewall is active and enabled on system startup

# ufw status
Status: active

To                         Action      From
--                         ------      ----
22/tcp                     ALLOW       Anywhere
80/tcp                     ALLOW       Anywhere
443                        ALLOW       Anywhere
22/tcp (v6)                ALLOW       Anywhere (v6)
80/tcp (v6)                ALLOW       Anywhere (v6)
443 (v6)                   ALLOW       Anywhere (v6)
Install And Enable Fail2Ban
Harden SSH access by installing and enabling Fail2ban
# apt install fail2ban

# systemctl enable fail2ban
Step12: Enable Nginx SSL
To enable SSL access to your WordPress site, you will need to modify the Nginx config file we created above to the one located here: https://github.com/linuxlabz/wordpress-debian/blob/main/yourdomain_https.conf its enable SSL, and the file is the same lab and example we created in this article. and no need to change Apache.
And you can create your self signed SSL in simple steps as described here: How to generate your self-signed SSL certificate in 3 Steps for Linux


