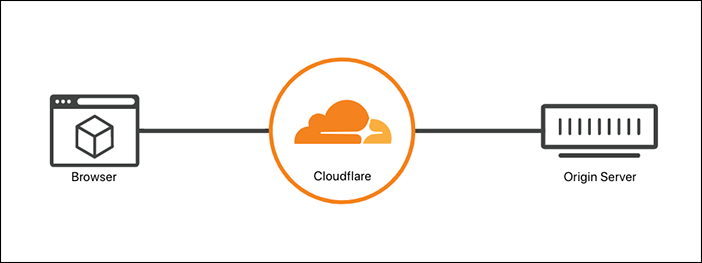
Cloudflare proxy will carry all hits that come to your web server, and so the WebServer will only see the Cloudflare proxy and consider it as the only client. now Let’s see how ModEvasive works.

How Apache ModEvasive Works
Apache ModEvasive mod_evasive will monitor and detect all requests that come to Apache, then analyze them, and if it found a Dos, DDoS, Brute force, or any attack behavior, it will take an action like temporarily blacklisting the requesting client IP address.
We know that Cloudflare proxy works as a carrier for all hits requests, and it’s the only client from point of view of Apache and ModEvasive.
In our scenario: ModEvasive feels that there is attack behavior, It detects a high request for the same page in the same minute and a high concurrent request for Apache.
ModEvasive now will take an action, it will block that Bad boy client’s IP address. and will fire an IPTable Reject command.
But for sorry, It will block the Cloudflare proxy IP address not the bad boy’s real IP, as it see that; the attack is coming from Cloudflare.
Restoring real Client / Visitor’s IP Address
As we discuss before How To Pass Real IP Address From Cloudflare To Nginx Apache and WordPress, we need to configure Apache mod_remoteip module with the Cloudflare CF-Connecting-IP header which contains the real client/visitor’s IP address. so Apache ModEvasive will make a correct analysis and monitoring, then can take the right action against the real client/visitor’s IP Address.
Configure Apache ModRemoteIP
We will use Configure Apache mod_remoteip module as the following
1- Enable Apache mod_remoteip
# a2enmod remoteip
2- Configure Apache mod_remoteip
Update your website configuration file, as an example for the default apache one, is located at : /etc/apache2/sites-available/000-default.conf
ServerAdmin webmaster@example.com
DocumentRoot /var/www/html
ServerName example.com
RemoteIPHeader CF-Connecting-IP
ErrorLog ${APACHE_LOG_DIR}/error.log
CustomLog ${APACHE_LOG_DIR}/access.log combined
3- Update Apache LogFormat
Updete the LogFormat at the file /etc/apache2/apache2.conf from
LogFormat "%h %l %u %t \"%r\" %>s %O \"%{Referer}i\" \"%{User-Agent}i\"" combined
Replaced by:
LogFormat "%a %l %u %t \"%r\" %>s %O \"%{Referer}i\" \"%{User-Agent}i\"" combined
By just replacing %h which present the Remote hostname or the IP address if HostnameLookups is set to Off <=> replaced with %a which present the requesting Client IP address.
4- Define Cloudflare trusted proxy addresses for mod_remoteip
Edit the file /etc/apache2/conf-available/remoteip.conf
And Append the following IP Address
RemoteIPHeader CF-Connecting-IP
RemoteIPTrustedProxy 173.245.48.0/20
RemoteIPTrustedProxy 103.21.244.0/22
RemoteIPTrustedProxy 103.22.200.0/22
RemoteIPTrustedProxy 103.31.4.0/22
RemoteIPTrustedProxy 141.101.64.0/18
RemoteIPTrustedProxy 108.162.192.0/18
RemoteIPTrustedProxy 190.93.240.0/20
RemoteIPTrustedProxy 188.114.96.0/20
RemoteIPTrustedProxy 197.234.240.0/22
RemoteIPTrustedProxy 198.41.128.0/17
RemoteIPTrustedProxy 162.158.0.0/15
RemoteIPTrustedProxy 104.16.0.0/12
RemoteIPTrustedProxy 172.64.0.0/13
RemoteIPTrustedProxy 131.0.72.0/22
RemoteIPTrustedProxy 2400:cb00::/32
RemoteIPTrustedProxy 2606:4700::/32
RemoteIPTrustedProxy 2803:f800::/32
RemoteIPTrustedProxy 2405:b500::/32
RemoteIPTrustedProxy 2405:8100::/32
RemoteIPTrustedProxy 2a06:98c0::/29
RemoteIPTrustedProxy 2c0f:f248::/32
Note that, all Cloudflare IP Addresses needs to be updated as they list them at the URL: https://www.cloudflare.com/ips/
Now Enable the configuration and restart Apache.
# a2enconf remoteip
Enabling conf remoteip.
To activate the new configuration, you need to run:
    service apache2 reload

# apache2ctl configtest
Syntax OK

# systemctl restart apache2
Simple ModEvasive Installation and Configuration
To install ModEvasive
# apt install libapache2-mod-evasive
If you do not want to use sending email as a notification action from ModEvasive, you can disable the Postfix Mail Server, as ModEvasive will install it as a dependent package.
# systemctl disable postfix
Edit the ModEvasive Configuration file /etc/apache2/mods-enabled/evasive.conf
    DOSHashTableSize    10240
    DOSPageCount        2
    DOSSiteCount        50
    DOSPageInterval     1
    DOSSiteInterval     1
    DOSBlockingPeriod   60
	#DOSEmailNotify      you@yourdomain.com
	DOSSystemCommand    "sudo /usr/sbin/iptables -I INPUT -s %s -j REJECT"
    DOSLogDir           "/var/log/mod_evasive"
Create the ModEvasive Log Directory
# mkdir -p /var/log/mod_evasive
# chown www-data.www-data /var/log/mod_evasive -R
DOSSystemCommand when ModEvasive decides to blacklist an IP, this system command will be run.
Then, restart Apache.


