Using Privoxy beside Shadowsocks can make our life easier, as the Shadowsocks Tunneling Proxy Server has its specific URI schema to use at the client-side, which starting will ss:// but with Privoxy as an interface, we can enjoy Shadowsocks, and directly connect it with our browsers and apps as HTTP/HTTPS Proxy.
We will:
- Update Ubuntu And Install The Prerequisites
- Install Shadowsocks Python Server
- Configure Shadowsocks
- Install Privoxy
- Configure Privoxy
- Start The Servers
- Tuning Ubuntu for network performance
- Using Shadowsocks Client
- Using Privoxy HTTP(S)
Step1: Update The Ubuntu 20.04 Server And Prerequisites
Update Ubuntu
# apt update
# apt upgrade
Install Python PIP And Libdodium
# apt install libsodium-dev libssl-dev net-tools
# apt install python-is-python3
# apt install pip
Step2: Installing Shadowsocks Python Server
We will install the latest Shadowsocks Python Server release using PIP as the following…
# pip install https://github.com/shadowsocks/shadowsocks/archive/master.zip
Collecting https://github.com/shadowsocks/shadowsocks/archive/master.zip
  Downloading https://github.com/shadowsocks/shadowsocks/archive/master.zip
     / 115 kB 2.5 MB/s
Building wheels for collected packages: shadowsocks
  Building wheel for shadowsocks (setup.py) ... done
  Created wheel for shadowsocks: filename=shadowsocks-3.0.0-py3-none-any.whl size=67284 sha256=227b76fe9a7874314e39f62729f52231441a732d27f227670f63f9039f5aa798
  Stored in directory: /tmp/pip-ephem-wheel-cache-i5p3pkva/wheels/a4/c1/27/cfd35cbea52487a4031faf82a8ebccb1f28d7018b8a83179e2
Successfully built shadowsocks
Installing collected packages: shadowsocks
Successfully installed shadowsocks-3.0.0
Step3: Configure Shadowsocks
We can configure Shadowsocks Server by creating the config file /etc/shadowsocks.json in the JSON format and appending the following config into it.
{
    "server":"96.126.111.211",
    "server_port":8388,
    "local_address": "127.0.0.1",
    "local_port":1080,
    "timeout": 300,
    "password":"barfoo!",
    "method":"chacha20-ietf-poly1305"
}
So we configure the server to listen to public networks IP-Address 96.126.111.211, server port 8388, and password “barfoo!“, with encryption method:”chacha20-ietf-poly1305“, and timeout 300 sec.
To make the Shadosocks Server listen to both public and local to serve Privoxy from the localhost, we need to create the /etc/shadowsocks.local.json config file, the same as server configs, but with a specific PID file for daemon mode, like the following.
{
    "server":"96.126.111.211",
    "server_port":8388,
    "local_address": "127.0.0.1",
    "local_port":1080,
    "timeout": 300,
    "password":"barfoo!",
    "method":"chacha20-ietf-poly1305",
    "pid-file":"/var/run/shadowsocks.local.pid"
}
Step4: Install Privoxy HTTP(S) Proxy Server
Installing Privoxy
# apt install privoxy
Enable Privoxy For Auto-Start
# systemctl enable privoxy
Step5: Configure The Privoxy Server
We will configure the Privoxy server to forward all requests to the Shadowocks server to get the power of Shadowsocks Tunneling by using Privoxy HTTP(S) Proxy as an interface.
Note: We can still use Shadowsocks with the open port 8388 directly using its URI schema and client, as we configure the server to listen to both local and public.
And we can download a suitable Shadowsocks client for Mobile devices, Mac, or PC from the Here.
Edit the Privoxy configuration file /etc/privoxy/config, set the listen-address to the server public IP-Address, And enable forwarding all requests to Shaodwsocks at the local Port 1080.
~~~~~~
#listen-address 127.0.0.1:8118
#listen-address [::1]:8118
listen-address 96.126.111.211:8118
forward-socks5t / 127.0.0.1:1080 .
#
# 4.2. toggle
# ============
~~~~~~
PS: Do not forget to replace the Public IP-Address with yours, and there is a dot at the end of the forwarding line.
Step6: Start Privoxy and Shadowsocks Servers
To enable auto-start for Shadowsocks server, we can add a crontab job to start at boot
# crontab -e
~~~~
~~~~

@reboot /usr/local/bin/ssserver -c /etc/shadowsocks.json -d start >/dev/null 2>&1
@reboot /usr/local/bin/sslocal -c /etc/shadowsocks.local.json -d start >/dev/null 2>&1

~~~~
Reboot your server or Start the Privoxy Server:
# systemctl start privoxy
And start the Shadosocks local and public server daemons
# ssserver -c /etc/shadowsocks.json -d start
# sslocal -c /etc/shadowsocks.local.json -d start
Check the Running services using
# netstat -puntl
Active Internet connections (only servers)
Proto Recv-Q Send-Q Local Address           Foreign Address         State       PID/Program name
tcp        0      0 127.0.0.53:53           0.0.0.0:*               LISTEN      423/systemd-resolve
tcp        0      0 96.126.111.211:8118     0.0.0.0:*               LISTEN      552/privoxy
tcp        0      0 0.0.0.0:22              0.0.0.0:*               LISTEN      567/sshd: /usr/sbin
tcp        0      0 127.0.0.1:1080          0.0.0.0:*               LISTEN      653/python3
tcp        0      0 127.0.0.1:6010          0.0.0.0:*               LISTEN      735/sshd: root@pts/
tcp        0      0 96.126.111.211:8388     0.0.0.0:*               LISTEN      652/python3
tcp6       0      0 :::22                   :::*                    LISTEN      567/sshd: /usr/sbin
tcp6       0      0 ::1:6010                :::*                    LISTEN      735/sshd: root@pts/
udp        0      0 127.0.0.53:53           0.0.0.0:*                           423/systemd-resolve
udp        0      0 127.0.0.1:1080          0.0.0.0:*                           653/python3
udp        0      0 96.126.111.211:8388     0.0.0.0:*                           652/python3
udp        0      0 0.0.0.0:57668           0.0.0.0:*                           652/python3
Step7: Tunning Ubuntu Kernel For Network Performance
Increase Open File Descriptors
To increase the maximum number of the open file descriptors, we will need to edit the file /etc/security/limits.conf, and append the following two lines.
# vim /etc/security/limits.conf
~~~~~~~~~~~~~~
~~~~~~~~~~~~~~

# for server running in root:
root soft nofile 51200
root hard nofile 51200

~~~~~~~~~~~~~~
~~~~~~~~~~~~~~
And apply the new value.
# ulimit -n 51200
Tuning The Kernel For Shadowsocks
Create the file local.conf into the sysctl configuration path /etc/sysctl.d/local.conf and insert the following configs
fs.file-max = 51200

net.core.rmem_max = 67108864
net.core.wmem_max = 67108864
net.core.rmem_default=65536
net.core.wmem_default=65536
net.core.netdev_max_backlog = 4096
net.core.somaxconn = 4096

net.ipv4.tcp_syncookies = 1
net.ipv4.tcp_tw_reuse = 1
net.ipv4.tcp_tw_recycle = 0
net.ipv4.tcp_fin_timeout = 30
net.ipv4.tcp_keepalive_time = 1200
net.ipv4.ip_local_port_range = 10000 65000
net.ipv4.tcp_max_syn_backlog = 4096
net.ipv4.tcp_max_tw_buckets = 5000
net.ipv4.tcp_fastopen = 3
net.ipv4.tcp_rmem = 4096 87380 67108864
net.ipv4.tcp_wmem = 4096 65536 67108864
net.ipv4.tcp_mtu_probing = 1
net.core.default_qdisc=fq
net.ipv4.tcp_congestion_control=bbr
Enable the configuration at the run time
# sysctl -p
So we can connect Shadowsocks directly using a suitable client, and we can download clients from Here. Same time, we can access our Proxy Server using HTTP(S) Via Privoxy, which forward requests to the local Port of the Shadowsocks.
Step8: Using Shadowsocks Client
Generate Client Base64 Encoding URI And QR Code
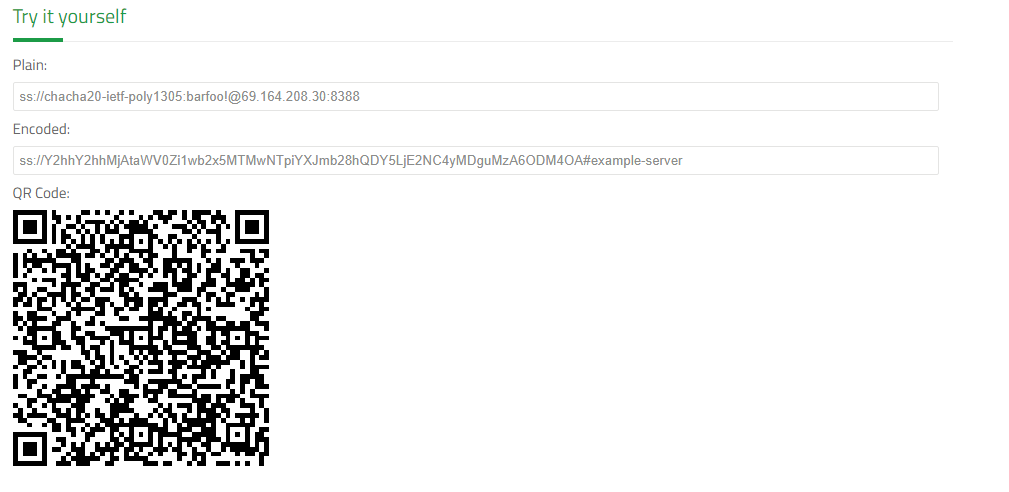
Shadowsocks URI format is ss://EcnryptionMethod:Password@Hostname: Port, and from our configuration credential, our Server URI is: ss://chacha20-ietf-poly1305:barfoo!@96.126.111.211:8388, but don’t forget to replace the IP Address 96.126.111.211 with your public server IP-Address.
After forming the server URI, we will need to convert it into Base64 Encoding URI format, and we can use the Try It Yourself converter at the Shadowsocks support Page Here.

So we can scan QR-Code with mobile devices or use the encoded URI for our used clients.
Step9: Using Privoxy HTTP(S)
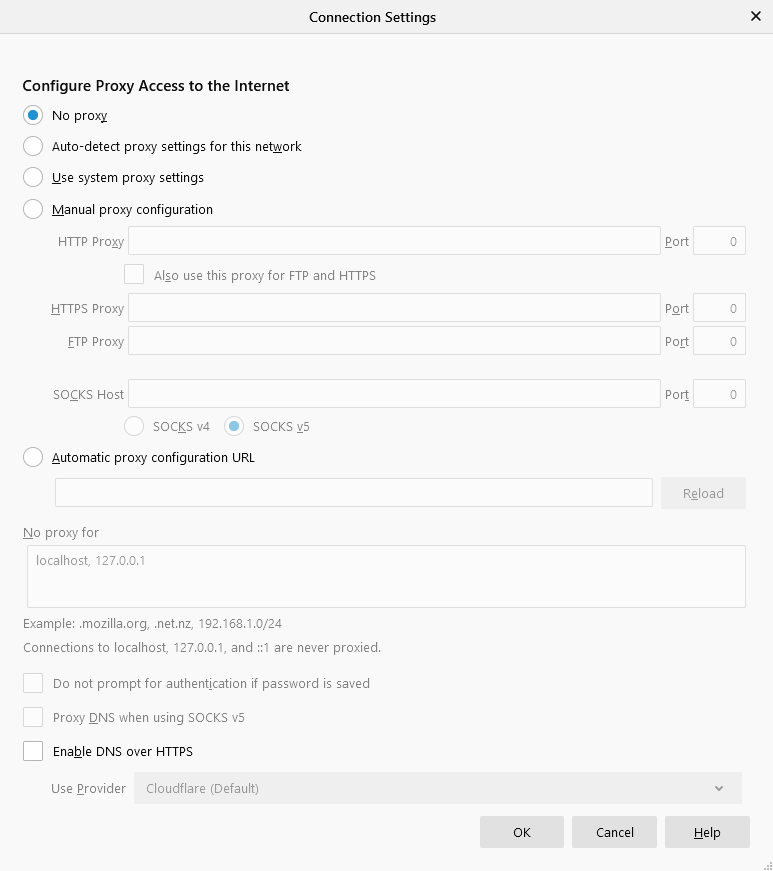
To use Privoxy, We need to configure our browser or application to use our server public IP-Address, and Privoxy listens Port. In our tutorial, we use 96.126.111.211:8118.
For Firefox, you can configure the proxy from Menu => Settings, and in Network Settings Section, Press the Settings button.


