This tutorial will install the tunnel proxy Shadowsocks Python Server on CentOS Stream 9 and enable BBR (Bottleneck Bandwidth and RTT) to improve the Linux response time, network speed, and performance by setting up the system config TCP congestion control to BBR.
For The Ubuntu version, you can visit the previous tutorial Install Shadowsocks Python Server With Enable BBR On Ubuntu 20.04 LTS.
We need to:
- Update our Centos Stream 9 Server
- Install Prerequisites and PIP Packages
- Install Shadowsocks-Python Server
- Enable BBR and tunning Kernel Configs
- Set Our Server QR Code And Base64 Encoded URI For Clients
Update CentOS Stram 9 And Prerequisites
Step1: Install updates
# dnf update
# dnf groupinstall 'development tools'
# dnf install bzip2-devel libffi-devel
Step2: Install EPEL Release And libsodium Package
# dnf install epel-release
# dnf install libsodium
Step3: Disable SELinux
We need to disable SELinux by editing the file /etc/selinux/config and setting SELINUX=disabled.
# vim /etc/selinux/config
~~~~~
~~~~~
# To revert back to SELinux enabled:
#
# grubby --update-kernel ALL --remove-args selinux
#
SELINUX=disabled
# SELINUXTYPE= can take one of these three values:
# targeted - Targeted processes are protected,
# minimum - Modification of targeted policy. Only selected processes are protected.
# mls - Multi Level Security protection.
SELINUXTYPE=targeted
~~~~
~~~~
Reboot your Server after disabling the SELinux.
Installing Shadowsocks Python Server Using PIP
Step4: Installing PIP
Python installed by default, and we need to install the PIP Package
# dnf install pip
Step5: Installing Shadowsocks Server
To Install the latest Shadowsocks Python Server using PIP, run the following PIP command
# pip install https://github.com/shadowsocks/shadowsocks/archive/master.zip
Configure Shdowsocks Server
Step6: Create The Config File
We can configure Shadowsocks Server by creating the file /etc/shadowsocks.json in the JSON format and appending the following config into it.
{
    "server":"0.0.0.0",
    "server_port":8388,
    "local_port":1080,
    "password":"barfoo!",
    "method":"chacha20-ietf-poly1305"
}
So we set up the Server to listen to all networks “0.0.0.0” of your Server, with server port 8388 and password “barfoo!“, with encryption method:”chacha20-ietf-poly1305“.
Step7: Increase Open File Descriptors
To increase the maximum number of the open file descriptors, we will need to edit the file /etc/security/limits.conf, and append the following two lines.
# vim /etc/security/limits.conf
~~~~~~~~~~~~~~
~~~~~~~~~~~~~~

# for server running in root:
root soft nofile 51200
root hard nofile 51200

~~~~~~~~~~~~~~
~~~~~~~~~~~~~~
And apply the new value.
# ulimit -n 51200
Tunning The Kernel For Shadowsocks
Step8: Tuning Kernel
Create the file local.conf into the sysctl configuration path /etc/sysctl.d/local.conf and insert the following configs
fs.file-max = 51200

net.core.rmem_max = 67108864
net.core.wmem_max = 67108864
net.core.rmem_default=65536
net.core.wmem_default=65536
net.core.netdev_max_backlog = 4096
net.core.somaxconn = 4096

net.ipv4.tcp_syncookies = 1
net.ipv4.tcp_tw_reuse = 1
net.ipv4.tcp_tw_recycle = 0
net.ipv4.tcp_fin_timeout = 30
net.ipv4.tcp_keepalive_time = 1200
net.ipv4.ip_local_port_range = 10000 65000
net.ipv4.tcp_max_syn_backlog = 4096
net.ipv4.tcp_max_tw_buckets = 5000
net.ipv4.tcp_fastopen = 3
net.ipv4.tcp_rmem = 4096 87380 67108864
net.ipv4.tcp_wmem = 4096 65536 67108864
net.ipv4.tcp_mtu_probing = 1
Step9: Set BBR tcp_congestion_control
Append the following two lines to the local.conf file which we created the previous step
net.core.default_qdisc=fq
net.ipv4.tcp_congestion_control=bbr
Enable the configuration at the run time
# sysctl -p
Run And Autostart Shadowsocks
Step10: Set Auto Start
We need to fire the ssserver command pointing to the server JSON configuration file to start our Server.
# ssserver -c /etc/shadowsocks.json
And to autostart Shadowsocks server after reboot, edit the crontab and append the following line.
# crontab -e
~~~~
~~~~

@reboot /usr/local/bin/ssserver -c /etc/shadowsocks.json >/dev/null 2>&1

~~~~
Generate Client Base64 Encoding URI And QR Code
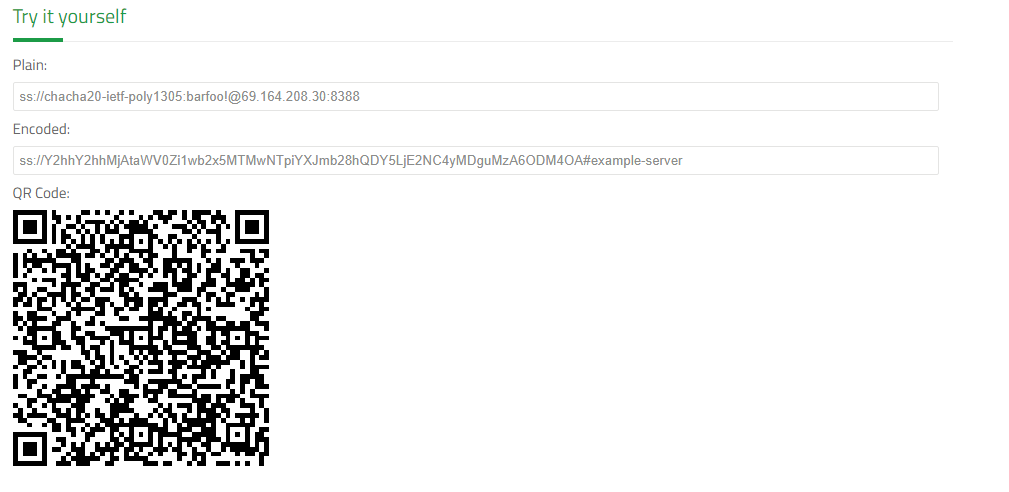
The Shadowsocks URI format is ss://EcnryptionMethod:Password@Hostname:Port, and from our configuration credential, our Server URI is: ss://chacha20-ietf-poly1305:barfoo!@69.164.208.30:8388, but don’t forget to replace the IP Address 69.164.208.30 with your public Server IP-Address.
After forming the Server URI, we will need to convert it into Base64 Encoding URI format, and we can use the Try It Yourself converter at the Shadowsocks support Page Here.


